How I Backup All Of My Video Projects

Ahhh yes…backup solutions. Everyone’s favorite topic!

And by “favorite topic” I really mean one that most people neglect until it’s too late. Far too many people I know only keep their projects on one hard drive and that is NOT a backup! If your data is only in one spot, it is not safe. In this post I will be discussing the ways that I backup my footage.

Now before we dive in, I just want to point out that I don’t think my method is the best method, but I do think it works well for right now. With more money there are definitely some nicer, more elegant solution though.

There are tons of backup solutions ranging from RAIDs, single drives, cloud based, NAS, and many more. My preferred method right now is to use two identical hard drives for any given year. As of right now I am using the Western Digital 8TB EasyStore drives I chose to use Western Digital after I had a Seagate hard drive fail in 2 months. While I know all hard drives will eventually fail, 2 months seemed just a bit too short for me. I have been using these WD EasyStore drives for a few years now and I have been fully satisfied with them without a single one dying (knock on wood!). These drives are also relatively cheap. As of writing this post (September 2018) the drives can be purchased for $159.99 (which breaks down to 0.02 cents per GB!) But now here is the real trick, these drives always go on sale during Black Friday for anywhere between $100-120. This is when I choose to buy the drives every year. I buy a pair of two drives for the upcoming year. So this year, in 2018 when I buy them on Black Friday I will be using them to store all of my 2019 work.

Now I mentioned that I always buy two of these drives. You should ALWAYS have at least two drives for your work. As I mentioned in the beginning, having one drive is NOT a backup and that hard drive will fail on you. Having two greatly reduces the chance that you lose any data. It is also great practice (and I must admit, I don’t always do this…) to keep the second drive offsite. Whether that’s at your friends house, family member, storage box, etc anywhere that isn’t where the other one is. That way if your house is robbed, house goes up in flames, etc you still have the other hard drive with all of your work stored safely somewhere else.

I don’t normally use these hard drives to work from. Typically I use them exclusively as an archive drive, which means no projects go onto it until they are fully completed. With that said, I did edit my documentary Why We Cube on these hard drives and they were okay. But for the rest of my projects that aren’t 7.5TB in size, I just edit off of an external SSD and as those get completed, they go to the archive drive.

Once I have moved the completed project to the first archive drive, I will use Carbon Copy Cloner once a week in order to make sure that the two hard drives stay completely synced up at all times. I normally put a sticky note on the drives to denote which one is the main hard drive and which one is the backup. Carbon Copy Cloner allows you to completely mirror the drives and delete any files that it doesn’t find on the first hard drive (This is configurable). If you wanted, you could keep both the hard drives plugged in at all times and have Carbon Copy Cloner do scheduled backups, but I don’t do this. I normally just leave one plugged in and the other one stashed away in a drawer until I need to back it up.

Screen Shot 2018-09-17 at 2.24.14 PM.png

Now the downfall to my method of buying two hard drives every year is eventually you will have these big clunky hard drives all over your house with power and USB cables everywhere. I hope within the next few years to get two large RAID systems (50TB+) so that I can have one RAID with all the data (and a second RAID as the backup!) instead of having 20 of these 8TB EasyStore drives everywhere. The only reason I don’t currently use a RAID setup is because they are pretty expensive and this system works for what I do currently.

My current hard drive collection. 50TB+. Each second drive is a clone of the one next to it.

My current hard drive collection. 50TB+. Each second drive is a clone of the one next to it.

Some of you may not even need to get large 8TB drives. I currently shoot on the Canon 1DX mk2. This camera eats ENORMOUS amounts of data (15 minutes of 4k60FPS is 128GB). If you shoot with nearly any other consumer/pro camera it probably doesn’t eat as much data as this. So you may be able to buy even cheaper and smaller 4TB drives.

This is part of the reason I am not currently using cloud services for my backup like Back Blaze. The file sizes of my camera are so large that it would just take too long to upload all of my data on a 5/Mbps internet connection with the 20TB+ data I already have. If I had a faster internet connection or just smaller amounts of data, I would definitely use Back Blaze since it is extremely affordable ($50 a year for unlimited storage!).

Now this is just my backup method for while I am at home. When I am on the road traveling for jobs, I use two of these 4TB Western Digital drives. They are pretty affordable and I don’t need to replace them every year since I just use these to keep things backed up when I am out of town. As soon as I get home I dump the projects to my bigger 8TB archive drives. I always keep these in separate bags while I travel in case one bag gets lost.

And lastly I have two external SSDs that I use to backup my desktop. These are bootable backups that I create with Carbon Copy Cloner. That way if my internal SSD dies, I can easily boot up from one of the backup external drives or even just take out the dead SSD and put the backup in my computer. The second external SSD is used to test OS updates and make sure things are stable before porting it to my main internal SSD. If one hard drive goes down, I don’t have have to bat an eye. I can have my system up and running again in less than a minute.

Many people ask me why I go through such great lengths to backup my data. Is it really necessary to have so many hard drives? My answer is, I NEVER want to lose data from an important shoot, a big project, or anything! With how cheap hard drives are today there is absolutely no reason not to have your data on two hard drives. I’ve watched too many of my friends lose pictures, videos, and other important documents simply because they didn’t want to backup to the cloud or have external hard drives keeping their data safe. If one of my hard drives is stolen, burned, dropped, or lost I don’t have to panic because I know I have a clone of it stored somewhere else. Having that piece of mind is huge.

I cannot imagine how devastating it would be to come back from months of travel, just to find out that your only copy of all the footage was corrupted or stolen.

Don’t wait until it’s too late. Start backing up now.

Why You Should Have a Template Folder Structure For Video Projects

One of the very first workflow things I implemented into my daily video life was creating a template folder for all my video files as well as a template file for Premiere Pro. This is something that one of my first mentors (Troy Gronseth of 12th Avenue Productions) taught me and it has easily saved me hours upon hours of time.

I also created a video about this topic if you would rather watch.

A template folder is easy to understand. Every time you start a new project, you need somewhere to store your media and project files, right? This means you're probably making a folder with your project title and then inside of that you have your footage, music, sound effects, graphics, pictures, etc. This can become VERY tedious to create every single time you make a project. Who wants to waste time making folders before they can start editing? This also allows you to have a consistent folder structure for ALL your projects which also allows you to navigate them faster.

Every person will have different needs as to what folders they need but I will share mine and what it looks like.

In the first level of my folder I have:

  • Delivery (for the final delivered project to the client)

  • Export (For rough drafts and revisions)

  • Project Files (Where my After Effects and Premiere files are stored)

  • Sources (This has all my media. Footage, music, sound effects, graphics)

The first level of my template folder

The first level of my template folder

If we go inside of the sources folder, you'll see three more folders.

  • Audio

  • Footage

  • Graphics

One of the second levels of my template folder.

One of the second levels of my template folder.

Inside each of these, I have even more folders to keep things organized. Audio has music, sound effects, and voiceover folders. Typically my footage folder doesn't have much inside of it since I am only shooting with one camera. But if you have more than one camera, you may choose to create folders for each of those cameras (GoPro, DSLR, drone, etc) so you can keep track of the files easier or if you are on a multi-day shoot, you can add folders for each day of the event and make sure you know what day each of your footage is from.

My folder structure for when I was shooting the 2018 Rubik’s Cube National Championships

My folder structure for when I was shooting the 2018 Rubik’s Cube National Championships

Inside of graphics I have a few things I frequently use on projects. I have my letterbox templates for 4k video and 1080p video. This is something I use very frequently so it only makes sense to include it in my template. I also have folders for animations (lower thirds, animated logos, etc), images (still pictures), and intros. I do contract work for a company that requires their intro be at the beginning of every video. Instead of wasting time on every project finding the intro, putting it in a folder and importing to Premiere I can just duplicate this template and have everything waiting for me!

Hopefully, by this point, you see why having a template is beneficial. I would probably waste several minutes every single time I start a new project if I had to recreate this folder structure from scratch! Not to mention hunting down the frequently used assets that I have to use. Having a template folder structure lets you start editing faster and helps you stay organized!

Now let's talk about the Premiere Pro template. Inside of my Project Files folder I have a Premiere Pro template file.

Where I keep my Premiere Pro project template. I always rename this to match the project name once I am starting a project.

Where I keep my Premiere Pro project template. I always rename this to match the project name once I am starting a project.

This is also where I start to save a lot of time. Every time I duplicate my template folder, this Premiere Pro project file is duplicated inside of it as well. When I open it, I have all my frequently used timelines that I might use for a project, my bin structure in Premiere that mirrors my Finder structure (You should make sure they match so finding files is easier!)

My bin structure in Premiere

My bin structure in Premiere

You may have noticed that I have my bins numbered in Premiere. I do this so that my bins will always stay in the same exact order. I prefer them in this order, so putting a number before the name allows it to never deviate from that order. You might prefer everything to be in alphabetical order though.

At the top, I have my sequences folder which is where I will keep all the timelines. I also have some template sequences that I know I might use on any given project so I don't have to create them every time I start a new project. You can see there is an assortment of timelines with different resolutions, aspect ratios, and framerates. I don't use every timeline for every project, but having them already created makes starting quicker. Once I select the timeline I am going to use, I often delete the others to get rid of clutter.

My template sequences that I use in Premiere frequently.

My template sequences that I use in Premiere frequently.

After this you can see that my bin structure closely mimics my Finder structure minus a few additional things such as a bin for titles, nests, and dynamic links. I like to keep my projects as tidy as possible. For smaller projects it might not be as important to be this organized, but I assure you as your projects get bigger and bigger this will save you a lot of time from trying to hunt down a long list of files that are all mixed up.

My Premiere Pro bin structure mimics my Finder structure closely.

My Premiere Pro bin structure mimics my Finder structure closely.

Now just imagine if every single project you started you had to recreate this folder structure AND the Premiere structure! You would be wasting tons of time that just doesn't need to be wasted. We want to focus on being creative, not working on annoying tasks. 

Once you have your Premiere Pro project set up the way you like, all you have to do is go to File > Save As and name it "Template" (Or whatever you want) then save it into the template folder you created earlier. Now every time you duplicate the folder, your Premiere Pro template will be inside of it as well.

Now just remember, every person is going to have a different folder structure and things that are important for how they work. My template has worked extremely well for me and I think it is a good starting point for many others, but don't be afraid to create your own template with the folders that are important to you! Just choose something that is simple and works for you.

Make sure to save your template somewhere you have easy access to. I like to keep it on the external hard drive that I edit from. This way you can quickly duplicate it to start your project.

In another blog post, I talked about using Alfred for video post-production and one of the things I mentioned was how I created a script to allow me to duplicate my template folder, name it, and place it in the appropriate working folder for me. Even more time saved! You can read about it here

Now to be fair, my method with Alfred involves spending money for the power pack as well as having knowledge of bash scripts. If you would like to keep things simple, I would recommend checking out Post Haste. Post Haste is a program that allows you to store your template folders and create them with a click of a button. This can be especially useful if you have multiple templates for graphic design, video production or maybe you need different templates for different clients. Post Haste can hold all of your templates and create them on demand. I would definitely advise checking Post Haste out.

I hope this post gave you insight on how to create a template for all your projects that works for you, saves time, and helps keep you organized!

Using Alfred Launcher To Speed Up Video Post Production

I hate to do things slowly. Ever since I can remember I've wanted to do things as quickly as possible. This probably has a lot to do with being involved in Speedcubing for the last decade where the goal is to always solve the cube as fast as possible.

Naturally, this extended into my work. I don't like to do repetitive tasks frequently. So if there is anything I can do to finish a task faster, I'm going to do it. One of my favorite tools for MacOS is Alfred. If you're familiar with Spotlight on MacOS, Alfred is the same thing but on steroids. People often ask why you would choose to use Alfred instead of Spotlight and I hope to talk about some of the very powerful things Alfred allows you to achieve and how it can help you speed up some preproduction video tasks.

As a disclaimer, many of the things I will mention in this blog post require the powerpack of Alfred which can be purchased for roughly $25. It is worth every penny, I promise! Alfred does also allow you to use the free version which still has many features that you can try out and see if you like Alfred.

At its core, Alfred is an application launcher. When you hit your keyboard shortcut to activate Alfred (mine is Command+space) a little window will pop up that you can type in. As you start to type, results that match what you have typed start to populate the window. If you open something frequently, Alfred will learn that you frequently open that and start to populate that result at the top of the list so you can open it quicker. You can see in the screenshot below that I very frequently open Premiere so when I only have to type "Pre" and Alfred knows that I want to open Premiere.

So what? Spotlight opens Applications too. Tell me why Alfred is better!

So what? Spotlight opens Applications too. Tell me why Alfred is better!


1. Navigating folders with arrow keys

One of my favorite features of Alfred is being able to quickly hunt through folders with my arrow keys. You simply type the name of the folder and you can start digging through it with your arrow keys. This is much better than opening Finder, clicking to the right directory, and then slowly clicking through all the folders. This might not seem like a big deal, but when you're doing it dozens of times every day, that time adds up and it starts to feel really annoying. 

Navigating a folder structure with Alfred. 4 seconds.

Navigating the same folder structure with Finder and mouse. 11 seconds

As you can see from the above GIFs, the time difference might not seem that large but again, when you repeat the tasks many times a day that time adds up! I bet Alfred has saved me hours of time alone with this feature in the last few years. This can be especially fast when you need to navigate your projects folder which may have many subfolders. 


2. Moving files with Alfred

The second thing that I use Alfred for is moving files around quickly. When I select a file and double tap the command key, Alfred brings up a little window asking me what I want to do with this file. Alfred calls this the "Buffer"

Screenshot_2018-09-10 00.06.18_r5FLmG.png

My most frequent use of this is to copy a file to my project folder for the current project I am working on. I often refer to my assets drive which has folders full of sound effects, music, and other various video effects. Instead of manually opening two Finder windows and navigating to each of them and then dragging and dropping, I can simply go into my assets drive and then hit command twice to bring up the buffer prompt. From here all I have to do is type the folder and use the arrow keys to navigate deeper into the folder that I wish to place the file in. In this case, I would be taking a sound effect and putting it in my sound effects folder which is inside of "Project name" > Sources > Audio > Sound effects. I love being able to use Alfred to copy/move files around my computer without actually needing to open up the Finder windows to do it. I estimate that using this method of moving files can save anywhere from 5-20 seconds depending on how deep the subfolders are that you have to navigate.

Now to be clear, I don’t use this for copying new files from a card off my camera. Alfred does not do checksum verification. For this, I use Red Giant’s Offload. But for generally moving files around my computer I use Alfred all day long.

3. Copying and pasting my template folder for Premiere projects

On my editing hard drive, I have several folders set up for the various projects that I might work on. Personal projects, YouTube, and Freelance. I also have a template folder that I use for ALL of my projects. If you aren't already doing this, you really should be! It will save you tremendous amounts of time. One thing that always annoyed me was having to open up Finder, navigate to the hard drive, and then copying and pasting my template folder, naming the folder, and then moving it into the correct folder. 

Warning: this part is much more technical than other parts of this post.

I had one of my friends help me set up this script to use inside of Alfred. I created my own workflow (which is another incredibly powerful part of Alfred that I won't touch on here today). 

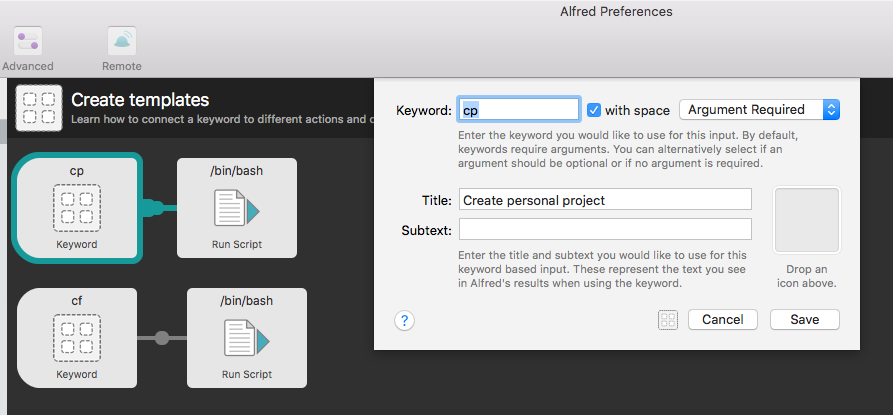
The workflow starts with a keyword. In this case, I have my keyword set to be abbreviations of what I want this to do. "CP" stands for "Create personal" "CF" stands for "Create Freelance". 

Screenshot_2018-09-10 00.22.28_IlVzyZ.png

After that, I have it connected to a terminal script (Or a bash script) which will run in the background. You can see my script below. You need to make sure to replace the volume destinations with your correct directories! The first line is telling Alfred where to place your new folder and the second line is telling Alfred where your folder template is that you want to copy.

The script to duplicate my template and place it with a name into the correct folder.

Screenshot_2018-09-10 12.06.32_0F5OFb.png

So now, all I have to do to create a new project is type "CF" and then type a project name. In this case, it would look something like cf Alfred Blog Post. Once I hit enter, this will create my template folder with the project name pasted inside of my freelance folder. The last line of the command "open ." will also open Finder to that folder if it is not already open.

Now, I must admit. This specific script is not very beginner friendly but if you do get it set up, it is extremely useful! This is a task that annoyed me for ages and I was very happy to get this setup. There is also a program from Digital Rebellion called Post Haste. This is a program that remembers and stores various template folders for you. Personally I think it is slower than my script, but it is also much easier to setup and I would definitely recommend it to new users.

4. Opening project files

In my first tip, I mentioned that you can use Alfred to navigate folders with your arrow keys which is much quicker than just using Finder. But to take it a step further, I have Alfred immediately find my Premiere project files so I can just hit enter to open them up. Sure, it isn't the worst thing to type my project folder name and then use the arrow keys to navigate to the project file and hit enter, but we can certainly be faster and that's what I'm all about.

Alfred has a "Quick File Search Mode" where you can hit spacebar and then type in the file name you're looking for and it will find and pin down that file. In this case, I open Alfred, hit spacebar and then type Alfred Blog Post. Since I named my Premiere project file this, it immediately comes up and I can hit enter to open Premiere and my exact project. I believe by using this method instead of just typing the file name, Alfred will prioritize files over folders in your search list.

Screenshot_2018-09-10 00.46.39_wMxle5.png

5. Ejecting hard drives

Alfred has the ability to execute many system commands which are useful. You can do various things such as put your computer to sleep, restart, shutdown, close all open applications, empty your trash, and also eject hard drives!

Screenshot_2018-09-10 00.55.05_wsvJix.png

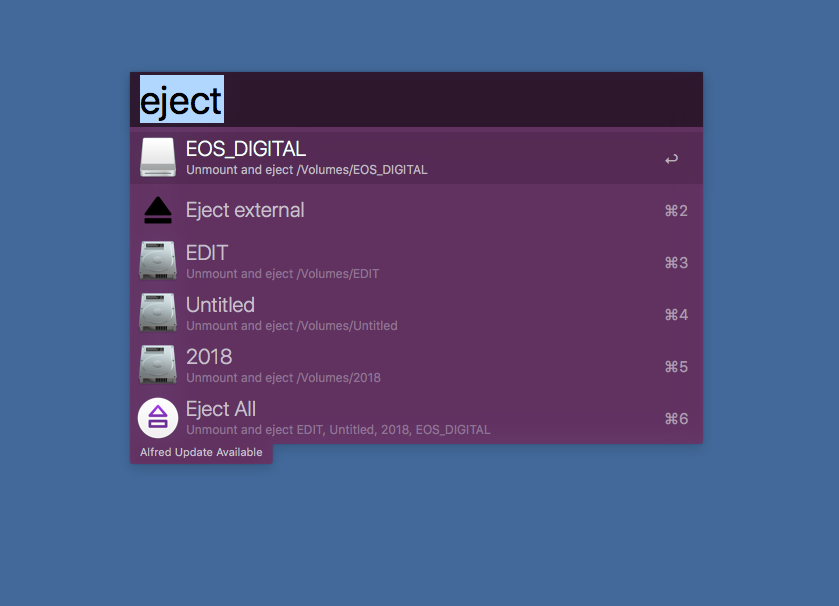
If you're anything like me, you may have many hard drives connected to your computer at any given time for accessing media. Instead of opening Finder and clicking on the arrow to eject the hard drive, you can simply open Alfred and type "eject" and you will get a list of hard drives that are available to be ejected. You can navigate to the drive you want to eject using the arrow keys or on the right-hand side you will also see that you can use shortcuts to select that drive and eject it (command+number). This is a very quick and easy way to eject your hard drives.

Screenshot_2018-09-10 00.56.06_fJFYUG.png

These are just a few of the ways that I use Alfred to assist in my video production while I am at my computer. There are so many more features that I didn't get the chance to cover in this blog post such as text snippets, using Alfred as a dictionary, calculator, web search, workflows, iTunes control, 1Password integration, and much more! I would highly encourage you to try out Alfred and see what you think. If you're a fan of Spotlight, I assure you that you will like Alfred even more.